
Hi there,
I have spent much time making Christmas and other occasion cards, but I wanted to make more autumn cards. Autumn colors are my favorites. On YouTube, I follow Tina on Cards and Coffee Time. Tina made a card that I loved using layering leaves. I have been needing/wanting layered leaves, so I purchased the set she used, plus the ink colors Tina used. To watch Tina’s video and see step-by-step instructions, please go to https://www.youtube.com/watch?v=f2T2UGdENxA&t=220s . I appreciate the talent Tina has for designing cards and sharing her ideas with the public.

Start with watercolor paper and a pencil. I wanted my card panel to be framed, so I used a die and die cutting machine. Draw a stem. 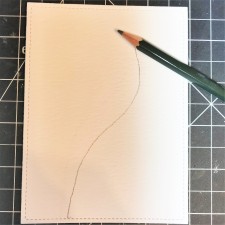
- Ranger Watercolor Paper
- Lawn Fawn Stitched Rectangle Die, 3.75 x 5 inches
- Cuttlebug Embossing and Die Cutting Machine
- pencil
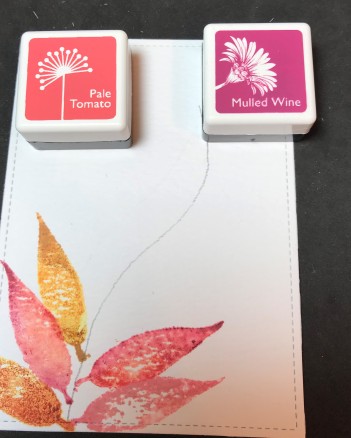
Next, use two color inks to stamp each bottom layer leaf going up the stem.
- Hero Arts Color Layering Grateful Leaves
- acrylic block
- spray bottle of water
Apply the two ink colors onto the leaf stamp, then spritz the leaf with water before stamping the paper.

The two colors here are from Hero Arts, Orange Soda and Just Rust. I have the Hero Arts Ink Pad Ombre that goes from Butter Bar to Orange Soda. So I just used that instead of buying a pad of Orange Soda.
Then, there’s Hero Arts Raspberry Jam and Red Royal. Ignore the 3 on the ink box. It was written there for another color layering stamp.

Next, Hero Arts Soft Pink and Cotton Candy Ink Pads were used.

Here is H.A. Butter Bar and Pumpkin Pie Ink Pads – Sorry, I forgot to take the photo after stamping this set of ink. It’s the third leaf on the top-left. Remember to spray a little water on the ink before stamping!

Continue with H.A. Red Tomato and Mulled Wine. This leaf is the top one on the right.
Repeat stamping the leaf going up the stem with the same color pattern, except start the second set of leaves on the opposite sides of the first set.


By this time, I was getting the order of my color placement mixed up, so I just tried to make sure there was a mix of yellow-oranges on both sides.
I continued stamping the leaves until I ran out of stem.


Let the leaves dry completely before embossing with gold.
I wanted a dark gold embossing powder. I had a jar that I’ve had for years and I can’t even find a name on it. It was probably produced before the industry got into making ultra fine powders. So in the end, this embossing powder was coarse and took a long time to melt on watercolor paper with its texture. I now recommend using a fine embossing powder. Use the matching leaf stamp that has the veins.
- VersaMark Embossing Ink Pad
- Hero Arts Color Layering Grateful Leaves
- acrylic block
- gold embossing powder
- heat tool


After stamping and embossing the veins, use the thin end of an embossing pen to trace over the branch and the leaf stems.
- VersaMark Embossing Marker
- gold embossing powder
- heat tool


Outline the leaves that don’t have the veins stamped on top.

On to the sentiment…… I used a phrase from the same stamp set and stamped it in a MISTI Stamping Tool. You can use an acrylic block if you don’t have a MISTI.
- Hero Arts Color Layering Grateful Leaves
- Hero Arts Mulled Wine Ink Pad
- 110# Neenah Classic Crest Solar White Cardstock
 To trim the sentiment, I used the same die that was used to cut out the front panel. Cut one end, turn the sentiment around and cut the other end.


To add dimension to the card front, a piece of Scotch Foam Tape was adhered to the back of the sentiment.

After cutting a piece of pink cardstock and a card base, I now had the layers I needed to put the card together.


- 110# Neenah Classic Crest Solar White Cardstock trimmed to 4.25 x 11 inches and folded in half to make a 4.25 x 5.50 inches top-folding card.
- 65# Recollections Pink Cardstock cut to 4 x 5.25 inches
- Ranger Watercolor Paper die cut to 3.75 x 5 inches
- 110# Neenah Classic Crest Solar White Cardstock die cut to 15/16″ x 3.75“
- Scrapbook Adhesives E-Z Runner Tape
- measuring gage
Add sequins to the card front.

- Pretty Pink Posh Friendship Mix Sequins
- Ranger Multi Medium Matte Glue

So now, all I have to say is what Tina says on her videos when something looks good to her, “Lovely!”
Thank you,
Tricia
CHALLENGES ENTERED
Simon Says Stamp Monday Challenge Thanks/ Thanksgiving http://www.inlinkz.com/new/view.php?id=733980
Word Art Wednesday Challenge #306 – #307 – Anything Goes http://wordartwednesday.blogspot.com/
Paper Sweeties Challenge #61 Thanksgiving/ Autumn https://papersweeties.com/blog/paper-sweeties-challenge-november-2017/ https://ltsqldb.com/v2_thumbnail_linky_enter.aspx?id=282508
FLCKRLV#23

Gorgeous card!!!!
LikeLiked by 1 person
Thank you, Wanda, for stopping by and for the wonderful compliment. I appreciate it. 🙂
LikeLiked by 1 person
Congrats on being in the spotlight!!!!
LikeLike
Great card. Lovely color shades. Thank you for joining Simon Says Stamp Monday Challenge.
LikeLike
Such a beautiful design and so smart to use the larger die this way for your sentiment. Biggest congrats on being in the SSS spotlight! How exciting! Hugs, Autumn
LikeLiked by 1 person
Thank you so much, Autumn. I didn’t even know I was in the SSS spotlight until I saw your comment. Yay! 🙂
LikeLike